Showing posts with label Report. Show all posts

Tuesday, July 19, 2016

Breakthrough at Mackenzell

Here is the third Fulda Gap Campaign battle report. This battle uses several special rules and those rules are detailed on the Fulda Gap Campaign page. Also this game uses a lot of proxies and partial assembled/painted models.


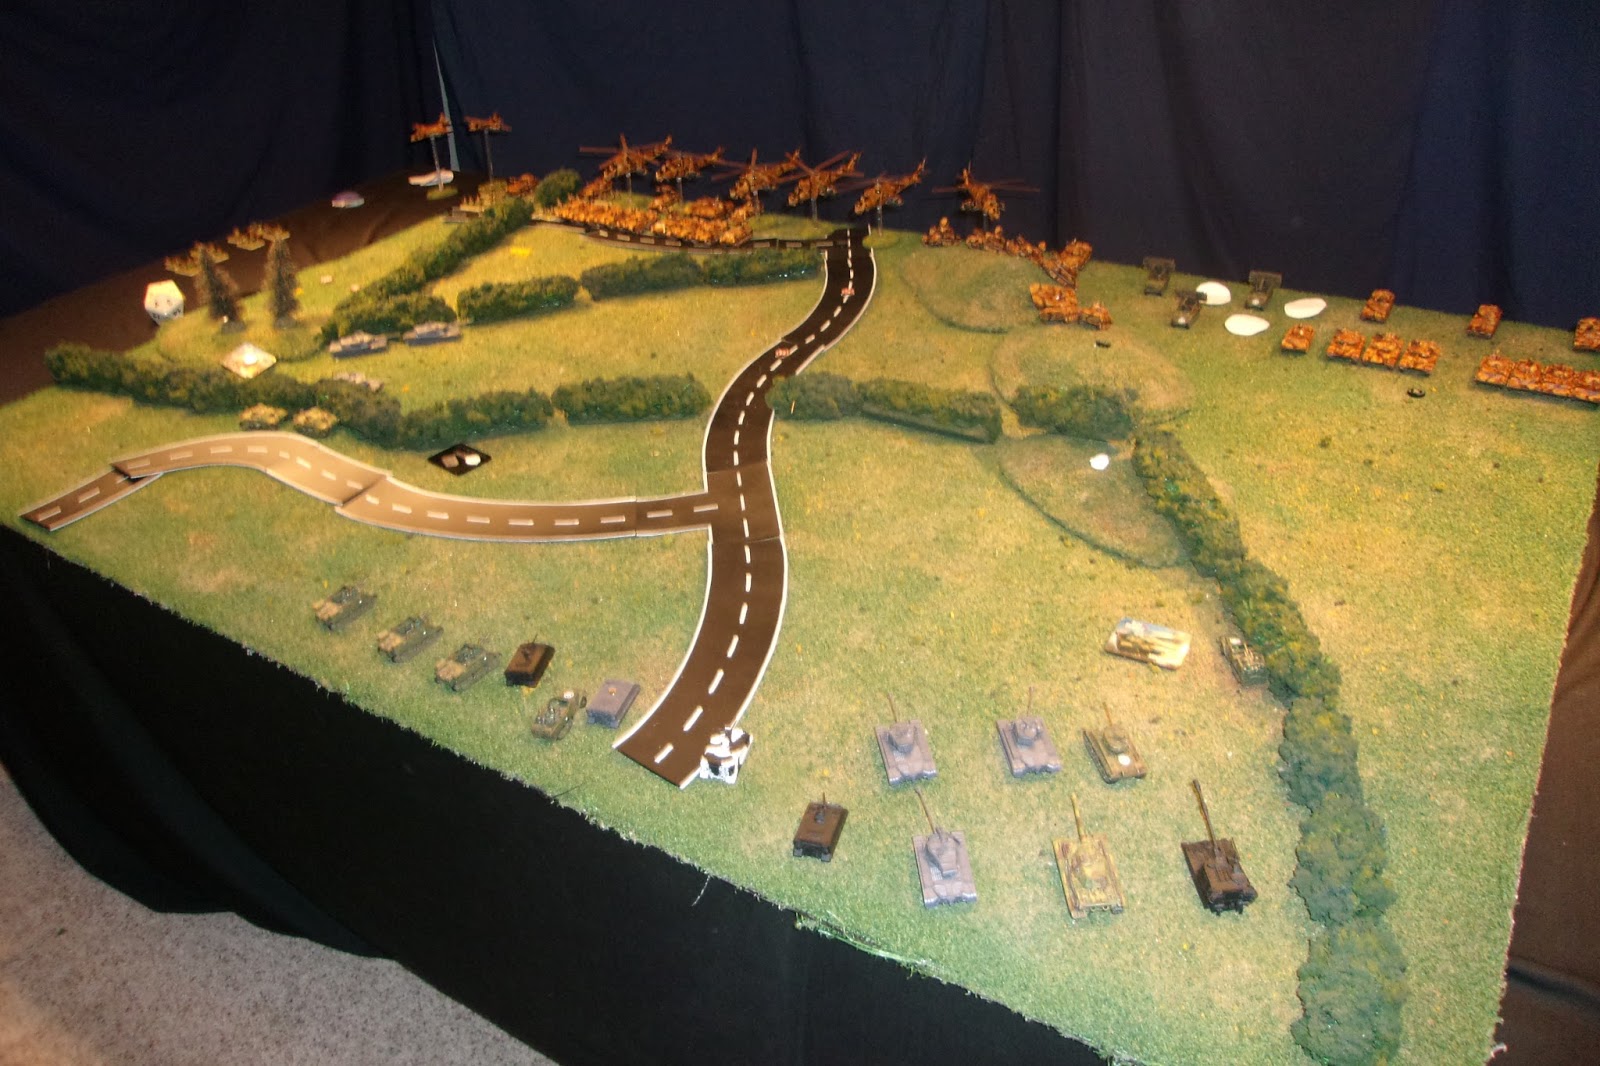
As usually, we are given pictures to model the battlefield after. This is a field neither of us would have put together on our own. The yellow and green bushes we normally use count as full woods in this game. That meant line of sight is incredibly hard to come by on the western side of the board. Units had to be almost right next each other to see, and sometime not even then. The white rocks counted as crates which we both avoid as much as possible. All in all a very strange board to play on.


Here is the very crowded Soviet force. Soviets did receive an additional 25 bonus points. The Soviet list includes the following:

Main Force

HQ T-72 x1
T-72 x3 w/ mine clearing devices
BMP-2 motor rifle company (AK-74 x4, RPG-7 x3, BMP-2 x4)
2S1 Carnation x3
2S1 Carnation x3
BMP-1 OP x1
ZSU-23-4 Shilka x4
SA-13 Gopher x4
MI-24 Hind x6
Frogfoot x4

25 Extra Points

T-72 x3 (added one to each of the three T-72 units above. Therefore, each unit of T-72s above had four tanks in them, not three)
Shilka x4
Shilka x2 (this unit was place into Flanking Delayed Reserves)
Gopher x4

In addition to this the Soviets Campaign assets are a BMP-1, Hinds x3 on Turn 1 and Frogfoot x2 on Turns 2 & 3, and the Off-Board Artillery is 2S1 Carnation x6.


Here is the US force pictured. The picture includes the following:

Main Force

HQ M1 Abram
M1 Abrams x3
M1 Abrams x3
M113 FIST
A-10 Warthog x2
AH-1 Cobra x2
M163 VADS x4
M109 w/Copperheads x6

In addition to this the US Campaign assets are a FIST x1, AH-1 Cobra x2 on Turn 3, A-10 Warthog x2 on Turn 2 and the Off-Board Artillery is M109 x3 w/ Copperheads and Bomblets.

The US has Immediate Reserves which meant half my units had to be place in reserves. The gap in the picture above shows which units start on the table (front half) and which units were in reserves (aircraft and second Abrams). The first unit of Abrams are sideways to show they are also in Ambush.

Mission

This time we got the Breakthrough mission which divides the field into quarters. The Soviets have the Northeast table quarter. The US can deploy in either the Northwest and/or Southeast quarters. Given that the Southeast has almost no terrain in it, I deploy most my force in the Northwest. The Southwest quarter is were the attacker places the objectives and his reserves come in. The defender (US) has to place half their force in Immediate Reserves and may place an addition unit into Ambush, which I already describe above who went where. No one can win the game until turn 6. The attackers are trying to control at least one of the objectives while the defender is trying to push the attackers away from the objectives.


Since the Southeast had almost no terrain I deploy a single FIST in very small patch of woods so I could have some vision on the Soviets. Everything else US deployed in the Northwest. I quickly learn the M109s could not see anything without a spotter unless the target is within 6 inches. The VADS and HQ wasn't much better. The Soviets had trouble trying to fit its large force into its deployment zone. Soviets got first turn.

Turn 1

Soviets failed to get in the Off-Board artillery and strike aircraft this turn. Several unit chase after the lone FIST but it was the machine guns of the Hinds that had first crack at it. The volume of bullets hit the FIST multiple times causing it to bailed out multiple times. This force remount checks which failed and cause the FIST to run off. All of the T-72s moved towards the main body of the US. One unit could fire on a single M109 and destroyed it. Two units fire on the other FIST and a lucky shot destroyed it. The last unit fired at the HQ and penetrated the armor. However he failed the firepower check so he only bailed the HQ Abram out.


US failed to get Strike Aircraft but did manage to get reserves and Off-Board Artillery. The artillery ended up being a hollowed victory since no one had vision to spot for it. I brought the Abrams in from reserves though I kept the the ambushing unit hidden. The Abrams moved up along the northern board edge and fired on an unit of T-72s. 4 shots landed but did no damage because 3 made their armor saves and I failed firepower on the glancing hit. My HQ blew up a nearby T-72. No one else could see anything so that was it for my turn.


Turn 2

For Turn 2 Soviets did not get their own strike aircraft but the campaign gave them 2 Frogfoots and they receive Off-Board Artillery. The leaders of the Hinds and Frogfoots spotted for artillery, Hind for Off-Board and Frogfoot for on board. The Hind was able to range in to hit 6 vehicles, resulting in the destruction of one VADS and one M109. The Frogfoot spotter failed to range in. Many T-72s shot at the HQ and doing nothing. This included two T-72 rolling 6 and 5 to hit, which I followed it up with 5 and 6 for my armor save. Another unit of T-72s return fire on the newly arrive unit of Abrams and bailed out 1 tank. Two groups of Shikas shot at the VADS and only bailed out one vehicle. The unit of 3 Hinds launch Spiral missiles at the Abram unit. This destroyed 2 Abrams and bailed out the third (the Abram bailed out earlier was destroyed). The other Frogfoot fire a missile that went wide. The remaining members of the six Hinds fired on the VADS. The anti-aircraft fire of everything I had left downed 3 of the 5 firing Hinds. The two left over Hinds destroyed another VADS. Because all the destroyed Hinds were around the leader leaving no else near him, this force a morale check which the Hinds failed and flew off. The VADS and Abrams also had to do morale checks but they both passed. It is at this point we both realize we could have used the mistaken targets rule to lessen our damage. Live and learn.


US did not get their strike aircraft but did get nearly everything else. I got Off-Board Artillery, reserves which I pick the Cobras to come in and the campaign assets gave me 2 A-10s this turn. A single M109 could see a Shilka and then blew it up with a straight shot. The single Abram remounted and returned fire on the T-72s. One T-72 was bailed out while a second was destroyed. My HQ fired at a different unit of T-72s and destroyed 1. The bailed out VADS remounted so he was able to shot. He returned fire on the Shilkas and destroyed one. The Cobras came in and spotted for the Off-Board Artillery and ranged in on the perfect spot, getting 5 vehicles under the template. Was only able to destroy a single Shilka though. The A-10s endured a lot of AA fire which eventually brought down a plane. The other plane Maverick missile a T-72, destroying it. Despite all the destruction, not enough concentrated fire happen to force a check on the Soviets. Rules wise we learn the aircraft are subject to the no movement requirement of being a spotter (at least when spotting for someone else). We allowed the Cobras to spot because the Soviets did the same on his turn.


Turn 3

Soviets this time gain both their own strike aircraft and the campaign gave them 2 Frogfoots. However the Soviets did not get in their Off-Board Artillery. Gophers tried to take down the Cobras but couldn't land anything. An unit of BMP tried to dash towards the objective but most of them bogged down instead. Shilkas took out their arch-rivals by bailing out the remaining VADS and the VADS failing the morale check to stay in the game. The HQ/T-72s knife fighting ended with the destruction of my HQ tank, but the character survive to jump into a M109. A different unit of T-72s move up to deliver side shots into the lone visible Abram, killing him. A lot of firepower went into the M109s but the only result was a single bailed out vehicle. That vehicle was bailed out twice with the help of the mistaken target rule and made the follow up remount check.

The US failed to get in strike aircraft. Their last reserved automatically came in but it was the A-10s so it didn't help. Off-Board Artillery was available and the campaign gave the US 2 Cobras. However due to the sheer amount of AA fire I felt it wasn't worth the risk to fire. The other Cobra unit tried and failed to range in for the perfect Off-Board Artillery template. The bailed out M109 failed to remount. Two other M109 had targets but roll a combine of 3.

Turn 4

No strike aircraft or reserves for the Soviets. They did get their Off-Board Artillery but had no option to actually use it. An unit of T-72s roll into the forest to wipe out the M109s but manage to only destroy one vehicle. It did force a moral check which the M109s passed. The Shilkas and Gophers combine fire over 30 shots at two Cobras and manage to only bring down one. No one else could see or was in range to fire.


US strike aircraft finally came in ... and were shot down. Off-Board Artillery did become available. A M109 remounted. All remaining M109s, including the now HQ fired straight shots into an unit of Shilkas. Only one hit but each hit is a death sentence. The campaign asset Cobras spotted for the Off-Board Artillery and ranged in on Gophers behind a hill. One Gopher was destroyed and a second was bailed out. The lone Cobra from the main list loitered off the board.

Turn 5

Soviets got both strike aircraft and Off-Board Artillery though the latter wasn't able to be used. Shilkas came in from reserves and took out the Cobras. A lot of firepower went into finishing off the M109s but could only bail them all out. Infantry was able to move onto the objective while the rest of the force spread out to prevent the US ambushing unit from entering. The M109s failed the morale check and were destroyed. However the M109 turned HQ was still around.


I was unable to reveal the ambush which meant there was nothing the US could do to stop the Soviets from winning next turn. The HQ did manage to remount and as a final middle finger to the Soviets destroyed a Shilka which force a morale check. The check failed, forcing the Shilkas to run off and giving US its second unit kill. That meant on top of Turn 6 Soviets win 5 to 2 instead of 6 to 1!

Monday, June 27, 2016

Defense of Mittelaschenbach

This is a battle report of my second game of the Fulda Gap Campaign. As before this game has several special rules unique to the campaign. These rules are detailed on Fulda Gap Campaign page. Warning, this game does use a lot of proxies. Between me still working on my models and the campaign giving out additional units we weren't planning on getting, proxies are unavoidable.


This was the battlefield and it was quite interesting. The western part of the map is completely opening making it really dangerous. There is a small patch of trees in the south just left in the picture. In the middle of the map moving towards the east is a giant hill. The hill has an east-west road that is flank rows of trees on both sides, which really made line of sight a headache. On the far east there is a larger patch of trees with a small clearing inside the forest.


Here is a picture of the entire Soviet force. The Soviet did receive an additional 25 points which was used to purchase new units. The following has the components of the main list as well as what the extra points were spent on:

Main Force

HQ T-72 x1
T-72 x3 w/ mine clearing devices
BMP-2 motor rifle company (AK-74 x4, RPG-7 x3, BMP-2 x4)
2S1 Carnation x3
2S1 Carnation x3
BMP-1 OP x1
ZSU-23-4 Shilka x4
SA-13 Gopher x4
MI-24 Hind x6
Frogfoot x4

25 extra points

Hind x6
Shilka x4
Shilka x2
Gopher x4

In addition to this the Soviets Campaign assets are a BMP-1 OP x1, MI-24 Hind x3 on Turn 1, Frogfoot x3 on Turns 2, 4, 5, 6, and the Off-Board Artillery is 2S1 Carnation x6.


Here is a picture of the US force. The US also receive an additional 25 which was used to boost the HQ and purchase new units. The following has the components of the main list as well as what the extra points were spent on:

Main Force

HQ M1 Abram
M1 Abrams x3
M1 Abrams x3
M113 Mech Platoon x3
M901 ITV x2
M163 VADS x4
M113 FIST
M109 x6 w/ Copperheads
A-10 Warthog x2

25 extra points

HQ M1 Abram (essentially the second in command)
VADS x4
ITV x2
ITV x2
Mech Platoon x3 w/ extra dragon missile team

In addition to this the US Campaign assets are a FIST x1, AH-1 Cobra x3 on Turn 1, A-10 x 2 on Turn 1, A-10 x 1 on Turn 2 and the Off-Board Artillery is M109 x3 w/Copperheads and Bomblets.

Mission

The campaign pick our mission for us: Free-For-All. The Soviets is attacking from the north while the US is defending from the south. The key elements of this battle is that everything starts on the board and the person with first turn is decided by a die off after deployment. The person with first turn can not use artillery or aircraft. If that person has campaign assets that come in on Turn 1, all their campaign assets get pushed back a turn. Both players place two objectives in their opponent's deployment zone (within 8 inches of the long edge).

Most of the US lightly armored unit deployed on the eastern objective, surrounded by trees. That made the objective easily defended and dangerous to take. As such, the Soviet practically didn't try. Instead all the action centered on western objective which was out in the open. The hill protected the Soviets very long line of Anti-Air and artillery. The Abrams were out in the open to face enemies coming around the hill. I was hoping the hill along with the double forest on top would help protect the Abrams flank but there is no spot safe from Soviet Aircraft!

Turn 1

The US won first turn which is a mix blessing as now most their units can not shoot, campaign assets are now pushed back, unable to use aircraft and the lost of the Off-Board artillery. Trying to make the most of it, the Abrams moved forward and the VADS that were behind them moved north to shoot at Hinds. A Mech platoon and ITV unit dash towards the clearing on the western side. Almost half of those vehicle got bogged down in the woods. The VADS were only in range of 2 Hinds and took one out. One unit of Abrams fired and wiped out the visible Carnations. The remaining Abrams combine their fire at the T-72s but only manage to bail out 2 tanks. This did force a morale check which the T-72s failed and ran off.


Soviets did manage to get in their Strike Aircraft on their turn as well as the Off-Board artillery. Two rounds of artillery fail to achieve anything as one failed to range in while the other range in on the ITV and Mech Platoons. Hits were made but the vehicles made their armor save. A unit of T-72s moved up the hill and shot at the VADS, destroying one. On western side, BMPs shoot at the HQ which destroyed the second in command. Frogfoot unit fired on some Abrams destroying one. That shot cost the Frogfoot half their numbers as 2 were shot down by 2 VADS. Of the 3 units of Hinds, one loiter off by mistake, the campaign hinds fired and missed while 5 copter fire on Abrams. The AA fire cost the Hinds another member and in turn got 2 hits, which the Abrams made their saves so no damage got through.


Turn 2

US failed to get Off-Board Artillery but got both campaign and normal strike aircraft in. I put the campaign A-10s in the northeast of the map to thin out the AA there but instead the A-10s got shot down. My M109s fire Copperheads at 4 Hinds but one hit land and the Hind made it save. The unit of 3 Abrams move under the Hinds so they could fire on shilkas hiding behind the hill. The volley destroyed 3 Shilkas, but the remaining one made the morale check to stay. The unit of 2 Abrams move on top of the hill and fired on AA vehicles, wiping out the unit of 2 Shilkas and destroying a single Gopher. My HQ moved into the woods to get cover but got bogged down, leaving its rear to the enemy. The ITVs in those woods shot at the BMPs, destroying 1. On the east side the men dismounted and moved forward. Their transports move up and fire machine guns at the Shikas in the woods but did no damage. The Cobras flew in and drop the salvo on Soviet soldiers, killing 2 and pinning the unit. My own A-10s fired on the T-72s on the hill but rolled snake eyes.


Soviets failed to get their strike aircraft and Off-Board Artillery in but the campaign gave him 3 Frogfoots. The BMPs shot at Abram HQ stuck in the woods. HQ failed two saves and got destroyed. I also failed my commander save to jump into another vehicle. The commander and an unit of T-72s shot at the Abrams on the hill, destroying one of them. The remaining Abram failed its morale check and fled the battlefield. The Hinds shot at the full strength Abrams and destroyed 2. The campaign Frogfoots destroyed the FIST that was out in the open. The T-72s that were parked on top of the hill continue shooting at the VADS and destroyed 2 more. The remaining VADS and Abram passed their morale check. Artillery rain down on eastern side, covering an ITV and most of the Mech platoon. It bailed out a transport and pinned the men.


Turn 3

The US got no aircraft and no artillery this turn. The campaign assets gave me one lone A-10 which got shot down. The last Abram move up to shoot at Gophers but completely missed. The ITVs in the woods kill all but one BMP. The Cobras tried to take out some T-72s but AA fire shoot them all down. It is at this point I soon realize I had a problem with my camera during this and last turn. I lost my audio notes for this phase and I don't remember what else happen on my turn. I do know either on this turn or on Soviets Turn 2, one Hind in each unit were destroyed bring their totals to 3 and 2. I have no idea what brought them down. I do believe the Mech Platoon on eastern side failed to rally.

As it is becoming quite common for both players, the Soviets got no artillery and no strike aircraft this turn. It is at this point Tracy remembered he had another unit of 6 Hinds that he had remove from the table turn 1 and completely forgot about them. He brought them in on the east side and they along with the Shilkas destroyed the 3 M113 transports. On the west side the Hinds fired at the lone Abram and destroyed him. The unit of two Hinds used it Gatling gun on the ITVs in the woods, but ITVs are very hard to hit. I had a lot of AA fire and it all missed. The Soviet troops finally rallied and moved up towards the objective.


Turn 4

US Off-Board artillery finally comes in but their A-10s refuse to return to the field. The VADS on the east side move up and shoot at the new 6 Hinds and did nothing. The 2 ITVs over there fire 2 deadly shots taking out a Carnation and a Hind. The M109s fired at the remaining 5 Hinds with Copperheads and destroyed 3 copters. ITV leader in the woods called in the Off-Board artillery on the motor rifle company, killing another soldier and pinning the rest. There was more firing but nothing else landed.


The Soviets normal strike aircraft is still on vocation like my own A-10s. But Tracy did roll to get his artillery in and his campaign assets gave him another 3 Frogfoots. The motor rifle company did rally and move onto the objective. The Off-Board artillery drop a smoke bombardment to screen the motor rifle company. All three units of Hinds move next to the ITVs trying to, but failing to do any damage to them. The T-72s on the hill finished off the last VADS on the western side. The range in artillery on the eastern side fired another bombardment, killing a single soldier. All 3 campaign Frogfoots were shot down by the eastern VADS.


Turn 5

Luck is running out for the US. I got no strike aircraft and no Off-Board artillery. The Mech platoon refuse to rally. The ITVs in the wood attempt to move so they could contest the objective. One bogged down while the other pass and could contest. That ITV machine the motor rifle company and manage to kill a man. All other ITVs fired at targets but nothing landed. Copperheads were fired at the unit of 3 Hinds, 2 were downed. The remaining Hind passed it morale.


The Soviets manage to get everything this turn. Artillery, normal strike aircraft and campaign aircraft! The 2 Carnations that was ranged in on the east side redirect it fire to place a smoke bombardment to screen the motor rifle company again. Said motor company tried to dig in but failed. Shilkas fired 18 shots into the Mech Platoon and miss every one. A second unit of T-72s moved on top of the hill. Lots of fire was pour into the ITVs on the eastern objective, eventually destroying them because I thought they loss their gone-to-ground when they hadn't. The new unit of T-72s shot at the 2 M109s that were in the woods, destroying them both. All the remaining Hinds fired at the bogged down ITV, eventually destroying it. The Frogfoots destroy the active ITV, nearly securing absolute victory for the Soviets.


Turn 6

Because of the smoke screen the only hope US has to prevent the Soviets from winning next turn is to get strike aircraft and take out the last 4 motor rifle company. I got nothing! No artillery, no strike aircraft and now no way to target the Soviet infantry. Given that I had lost my only purpose this turn was to do as much damage as possible. The Mech platoon finally rallied. They moved up because the Shilkas were just slight out of range of their weapons. Pouring their LAWs into the Shilkas, two were turned into burning husk. The remaining Shilka passed its morale to avoid the unit being lost. The VADS moved towards the Hinds, crossing the woods. One VADS bogged down and only one other was in range. Its fire did nothing. The remaining M109s return fire by copperheads into the T-72s and destroyed 2. Again the Soviets passed it morale. My turn ends and the Soviets starts their turn 6 by winning 4-3!

Saturday, June 11, 2016

Battle of Thermopylae Teufelsberg-Pietzeistein Forest

Captain Jack, as he was known to his men, was uneasy. He had the feeling something big was going to happen that day and with the current tensions, that something would probably mean World War 3, with him being on the front line. He was lying down in the grass at the edge of the tree line. His tank was several hundred yards behind him, hidden in the forest. Scanning the horizon for the enemy, Jack heard someone running towards his position. Jack lowered his binoculars and got to his feet, confident that enemy wasn't THAT close to them yet. Lieutenant Dawley ran up to Jack with concern written across his face. "The Russians are advance here! Its an attack!" he said. "How many are we looking at?" Jack asked the Lieutenant. "Probably all of them!" Captain Jack was about to admonish the lieutenant until something on the horizon caught his eye. Captain Jack could see dust clouds no matter where he look north. He could also now hear the roaring of jet engine in the distance. He wasn't sure what they were, but he knew they weren't American! "Get to your track!" he screamed at his lieutenant as he made a mad dash to his own. Once in his chair Captain Jack radio the battalion to let them know his position was about to be overrun with Soviets and he was planning to make a strategic withdrawal. He was told to delay the Russian as much as possible before withdrawing. "Sure, no problem," he sarcastically thought. He switch the radio to the local net and began barking orders as he thought them up for the retreat. Second Lieutenant Maxwell Short, the fire support office realize the situation must be dire judging from Jack's orders and tone. He switch his radio from the local net to call for air support. He knew they were going to need it if there were to survive the Soviet Offensive. It was just a matter if the air support would arrive in time..."

This is a campaign battle report of my first game in the Fulda Gap Campaign. Since I don't have a page for the Fulda Gap Campaign up yet, there are some things I need to explain about this battle report before I go on. First this battle report uses a lot of proxies. Most of my force is still not assemble and painted and even if it were, the campaign adds addition units neither had plan on buying. Next, the campaign has three unique rules that changes the normal game. While a default game is 100 points per side, the campaign maybe give either player an additional 25 points to expand their force. The opponent will not know about this bonus ahead of time. For this report the Soviet receive the addition 25 points while the US did not. Second, both sides have the use of off the table artillery. The artillery count as having unlimited range but will need a spotter to fire. To get this artillery a check needs to be passed after rolling for strike aircraft. The Soviets artillery count as a 6 gun carnation battery and will fire on a 4+ roll. The US get a 3 gun M109 battery with the copperhead upgrade and will fire on a 5+ roll. Both forces gets an additional observer. Lastly, both sides have a secret list of when addition aircraft will reinforce their army. The opponent has no idea when or how many aircraft will show up until it is announce. When helicopters show up, they stay for the rest of the game and count as apart of the rest of the force. Strike aircraft are automatic but are only available for that turn. If a player get strike aircraft in multiple turns, any destruction of aircraft does not carry over. That means if a player is getting 2 strike aircraft in turn 1, 3 and 4, that player will get 2 strike aircraft in turns 3 and 4 even if they were destroyed in turn 1. Now lets get into the battle report proper starting with the board


We got a map of where our battle was suppose to take place so we tried to make the battlefield resemble that map. What we got was very interesting. We didn't have much terrain overall but we did get 2 thin tree lines that bisected the board. The hill on the west side is actually a forest. We added trees to it later. The three hills on the top right were hills and also help sub-divide the board. Since tanks couldn't fit on top of the tree lines, we had the rule that if you were next to a tree line, you were counted as being in the forest and required a cross check. We both had the same idea of who would get the most benefit from the map. Who actually DID get the most big for their buck is a different story, which I will get into shortly.


Here is a picture of the entire Soviet force. I'm not sure what's what so I'm just going to list what is in it:

HQ T-72
T-72 x3 w/ mine clearing devices
BMP-2 motor rifle company (4x AK-74, 3x RPG-7, 4x BMP-2, 1x SA-14 Gremlin AA)
BMP-2 Scout x2
BMP-2 Scout x2
2S1 Carnation x3
2S1 Carnation x3
BMP-1 OP
BMP-1 OP (bonus from the campaign)
ZSU-23-4 Shilka x4
SA-13 Gopher x4
BM-21 Hail Rocket Launcher Battery x3
MI-24 Hind x6
Assault Landing Company (AK-74 x6, RPG-7 x4)
Frogfoot x6

In addition to this, Soviets got MI-24 Hind x3 to come in on Turn 1 from the secret list.


Here is a picture of the US force. It includes:

HQ M1 Abram (its the black one in front)
M1 Abrams x3 (right behind the HQ)
M106 x3 (proxies right behind the Abrams)
M901 ITV x2 (StuG proxies right behind the M106)
M113 FIST x2 (includes bonus one from campaign, next to the StuG)
M163 VADS x4 (the 4 M113 chassis)
A-10 Warthog x2
M109 x6 w/ Copperheads and Bomblets (the 6 vehicles in back, the black one is the actual model)

Mission

The rules of the campaign said we had to play a defensive battle with the Soviets attacking from the north/top of the map and the US defending from the south/bottom. The die roll was 4, which gave us Fighting Withdrawal. The key elements of this mission is that both side start with everything on the table with the defender getting to put one unit in ambush. I pick one of my Abrams unit place in ambush. If the Soviets control any of the three objectives at any time, they win. If the US can not lose by Turn 8, they win. One last point, starting on Turn 3 and every turn afterwards the US adds a "delay counter" or removes a unit depending on how many are left. The US gets to remove an objective on Turns 6 and 7.


Because my deployment zone was half the board and there is not much concerning terrain beside the tree lines, the Soviet scout's spearhead special rule was render useless. The Soviets only had an 8 inch deployment zone and the scouts could only extend that 4 inches behind the hills. Even then other Soviet units couldn't much beyond that because they were in clear view of my deployment zone (which counts as my teams for the spearhead rule). Nevertheless the Soviets greatly outnumbered me and had first turn.

Turn 1

The Soviets failed to get in their strike aircraft and off board artillery. Since none of his spotters were in a good position, Tracy move all of his artillery and observers up to get a better view along with most of his force. Some vehicles failed a cross check and bog down, which will be a running theme for the rest of the game. On the west side an unit of T-72 move up and shoot at the Abrams in the woods, destroying one. The six hinds had move behind those Abrams and finish the Abrams off. The ant-air fire from the Abrams, HQ and the ITVs took out a single before they shot. On the east side, the BMP-2 transports move up to near the tree line close the M109s. Three T-72s move up and fire on a FIST hiding in the woods. Tracy got a lucky 6 and blew the FIST up. The 3 hinds had moved behind those T-72s and would have also fired on the FIST if the tanks had miss.


Bottom of Turn 1, US failed to get in their strike aircraft but did get the off the table artillery. The secret list did give the US 2 A-10s to use on turn 1 so it was like it made its strike aircraft roll. The VADS moved up to put the 3 hinds into range and shoot them up, destroying 2. The FIST spotted for the 6 M109 to fire copperheads at the 5 hinds and knock two of those out the air. The heavy mortar leader spotted for the off-board artillery to drop a bombardment on the Shilka on the hill. Range in on them but only manage to bailed out a single Shilka. In retrospect, that was as good as destroyed since that Shilka never remount for the rest of the game. The A-10s avenged the FIST by destroying one of the T-72s that shot at it. More things fired this turn but nothing else landed.


Turn 2

Soviets got everything this turn. Strike aircraft, off board artillery and even the campaign gave Tracy an additional 2 Frogfoots this turn. Tracy loitered single Hind off the table to prevent him from losing the unit. The Soviets poured a lot of firepower into the ITVs and my HQ on the west side. 6 Frogfoots, 3 remaining Hinds (both of which stay out of range of the VADS), T-72s and more all fired. Only a single ITV got destroyed. It forced a morale checked but the remaining ITV passed. On the east side the infantry disembark and prepared to assault the M109s. The T-72s (and maybe something else) shot at the VADS, one got destroyed and a second was bailed out. A spotter for the off board artillery tried to range in on the M109s but rolled 2,2 and 1. The 2 Frogfoots fired on the remaining VADS but their anti-aircraft fire blew them out of the air. This made Tracy happy for now he can assault the M109s with his infantry. I think since .50 cal machine-guns is really only used to shoot at aircraft in our games, he forgot their normal rate of fire is 3. His men didn't fair well running into 18 shots. Half of the infantry was killed forcing the remaining men to fall back. At this point I'm thinking while the US held, things looks really bleak.


At this point I should say while I'm describing most of what the US did, I'm just highlighting the Soviet turn. The reason is that the Soviet just have so much stuff and most of what I'm leaving out is moving, failing cross checks or both. On the US turn the strike aircraft came in but the off board artillery did not. Since I was losing the west flank badly I brought my Abrams out of ambush to help protect the objective. Moving through the tree line, all three Abrams had to take a cross check and they all passed. Being face to face with the T-72s, the ambushing Abrams fired and destroyed enough tanks to force a check and caused that unit of T-72s to flee. The 6 M109 fired copperheads into the Hinds again but did no damage this time. So the ITV shot at them and took a Hind out. My HQ shot at the Shilkas, destroying 2 to force a morale check. A check they passed. The heavy mortals moved up to support the M109 from the infantry by giving them covering fire. Since some of the infantry was hiding behind the trees, they could sneak up on the M109s, preventing some their defensive fire. Of course I didn't moved the heavy mortal far enough so they couldn't help out anyways. One VADS moved up to contested the eastern objective. One M109 was right on the line to being able to contest so I wanted to make sure another vehicle was clearly within 4 inches. The A-10s was going to clean house on the eastern flank, but anti-aircraft fire got the best of them and they were shot down.


Turn 3

For Soviets turn 3 they got their strike aircraft in but not their off board artillery. The campaign gave the Soviets another set of 2 Frogfoots whom come in despite the previous set were destroyed. That gave Soviets back-to-back turns of having 8 Frogfoots in play. Everything on the west front shot at the Abrams platoon, including all 8 Frogfoots, and it was just barely enough to destroy them all. On the east coast the VADS got wiped out by tag team shots from a T-72 and Carnations' straight shot. Everything else over there shot at the M109s and bailed out half of them. I believe the infantry assaulted again and again got stopped by the .50 cal machine guns. Tracy decided to shoot his men so none of them were able to deny defensive fire.

For US they failed to get their off board artillery. Soviets now have infantry in the forest on the western front near the objective. This forces the US to get something over there to stay in the game. The HQ tries to move other there but fails its cross check and bogs now. Now the ITV has to move and it passes its check so it can now contest. On the east 2 M109 remounted while the third failed the check. Having 5 guns I split my shooting to do 3 copperhead shots into the T-72s over there, blowing them up, 2 straight shots into the Carnations and destroying 2 as well. This force a check on the Carnation but they made it. On the drive home I began to wonder if this was a legal move. I forgot artillery has a rule that if any gun fires a bombardment, the other guns either has to join the bombardment or they don't fire. Then again, copperheads is not a normal bombardment. Something I need to check out on the forums but in any case it didn't change anything in the game. I will explain why at the end.


Turn 4

Soviets did not get their 6 Frogfoot strike aircraft but they did make their off board artillery roll and over the screams of Captain Jack and myself, the campaign gave them another pair of Frogfoots this turn. On the east the M109 were essentially surrounded and was fired upon from all sides plus the off board artillery. The few that survived failed their morale check and fled. On board artillery bombardment ranged in and destroyed the remaining FIST and one of the heavy mortars. In the west, several shots fired into the HQ, with the Frogfoots delivering the killing blow. Captain Jack's final words as he heard jet engine toward his position were "Oh COME ON!" The Hinds sealed the deal by destroying the ITV.


The Soviets turn is now over but at this point nothing US can do to stop the game from ending. Tracy is controlling 2 objectives on both sides of the board and the only thing the US have left is 2 M106 heavy mortals. The campaign would have given me 3 Cobras on Turn 4 but it was too little too late. Even with the Cobras I thought there was nothing I could have done to change the result of the battle (I was wrong) and I was tried of getting my teeth kicked in. The only units the Soviets lost were 2 units of T-72s. The Soviets force was large enough to ignore one of those lost units for victory points, which means the Soviets won 5 - 2.

Summary

Let's start with the ending. I was quickly put in a bad place and had so many ways to lose. I was really close to being tabled and because of the mission would have eventually been force to remove at least one of my remaining units before turn 8. The reason M109 mistake, if it does turns out to be one, wouldn't have change anything was that I was going to shoot the T-72s no matter what and the Carnations made their morale check. Now if they failed their morale check then it would have change the game because that would make the Carnations the third unit destroyed which would change the final score to a 4 - 3. That also means that I should have played out Turn 4 because if the Cobra could have wiped out one unit, it would have affect the score. We almost never use victory points before so I was unaware how it work until after we quit and looked it up. By the end of the game I was emotionally drained. While Tracy had some really good rolls at key moments, his dice rolling was overall below average and down right sad at times. I think this gave me false hope in thinking of turning the game around. He just had too much stuff for me to overcome.

The terrain was extremely interesting as we would never setup a board like this on our own. We both thought it gave the US a stronger advantage but by the end of the game there is a debate to say the Soviets benefited more. You can say the US benefited more from Terrain in the east while the Soviets benefited in the west. Tracy had to us so much overwhelming firepower to remove the few models I had in the western woods. Then again, it was nearly 60 points worth of US so it probably should have been hard to remove them. With the lost of my first FIST, Soviets could use the tree line in the east to block all line of sight to them, allowing them to move up to the objective without being shot at.

I won't comment on the campaign rules until the campaign ends. I will go into more details about the system when I make the Fulda Campaign page. Despite the long odd I did enjoy playing most of this game. Coming into the game I had the feeling I was going to get creamed but the actual battle was closer than what the score says. One thing I did forget to mention in the report was that I got 4 minefields and they did play a minor role in the game. They are hard to see in the pictures but I put 2 on the road which I don't think help very much. The other 2 above the forest on the western edge. This greatly slowed down the Soviets infantry by making them go around the minefield. They probably could have gotten to the objective in a turn or 2 sooner than they did. In any case this was nearly an overwhelming victory for the Soviets.

Wednesday, July 3, 2013

FoW: First Campaign Battle

FoW


Parachute Rifle Company (101st) Vs. SS-Panzergrenadierkompanie

We played our first game of the Operation Overlord campaign and it was interesting to say the least.  There were many mistakes on both side but overall it was a fun game.  The 101st was played by neaceul and I played the Germans.  As I still don't have any models yet all the German models were proxy with Allies with a little Soviet forces borrowed from a friend.  I believe the 101st had some slight proxying as well.  I will try to make things as clear as possible.

The list

Parachute Rifle Company (101st)
Parachute Rifle Company HQ (company command carbine team, 2iC command carbine team, 3 bazookas)
Parachute Rifle Platoon (hq, mortar squad, 3 rifle squads, 3 extra rifle/mg teams)
Parachute Machine-Gun Platoon (hq, 1 machine gun section, 2 bazookas)
Parachute Mortar Platoon (hq, 2 mortar sections, 2 bazookas)
Parachute Field Artillery Battery (hq, 2 gun sections)
Priority Air Support
 
   
Panzergrenadierkompanie

Headquarters HQ

SS-Panzergrenadierkompanie HQ
2 Cmd Panzeraust SMG team
1 Kfz 15 field car
1 Motorcycle & Sidecar

Combat Platoons

SS-Panzergrenadier Platoon
1 Cmd MG team
6 MG team

SS-Panzergrenadier Platoon
1 Cmd Panzerfaust SMG team
6 MG team

SS-Panzergrenadier Platoon
1 Cmd MG team
6 MG team
3 3-ton truck

Weapons Platoons

SS-Mortar Platoon
1 Cmd SMG team
1 Kfz 15 field car
3 Observer Rifle team
3 Kubelwagen
6 8cm GW34 mortar
6 3-ton truck

Divisional Support

2. SS-Panzer Platoon (Fearless Veteran)
4 Panther A

SS-Tank-hunter Platoon
3 Marder III M

part of the proxy German army.

The Game

We played the Airborne Assaults Rules & Seize and Hold mission.  101st parachuted in on the unsuspecting Germans a little before dawn.  It was a long night.  The table looked as follows:


Both sides had to hold half of our forces in reserved.  The German side look like this:


The units with dice next to them were what I held in reserves.  Those were all three of the Panzergrenadier Platoons and Marder III Tank-hunter Platoon.

Because of the way the objectives were place, the game was split into 2 halves.  For easy I will call it the West and the East.  German had to deploy their 3 units first anywhere on the board.  My HQ was on the board but they essentially did nothing all game.  On the West I had my mortar platoon.  The East had my platoon of Panther As.  The Panthers were spread out to also defend a third objective that was removed by neaceul.

The mortar platoon in the West

The mortar team's observers resting in buildings

The dreaded Panther As
 The 101st also had 7 units so only 3 could come on at turn 1 plus reserves.  No reserve showed up.  Since the 101st platoons are parachuting in, they showed up on a random position on the board.  In short, on a 6 six sided die a roll of a 1, 2 or 3 the platoon would land somewhere on the East, 4, 5 or 6, the West.  It just happen that all three landed in different places on the East.


The 101st had first turn.  They move up but had nothing shoot because of night fighting rules.  My turn 1 saw a Panzergrenadier Platoon enter from reserves.  The panthers started the game bailed out but all four passed their skill test to get back in.  The Panzergrenadier Platoon and the Panthers moved up and shot a lot of machine gun fire at the red and blue teams of the 101st.  The results were lackluster.  Only a single blue team was killed. Neither were even pinned down.


The Panzergrenadier Platoon tried to move to a better position with the storm trooper move but the 101st was not having it.  On turn 2, still with no reserves the 101st moved up and shredded the Panzergrenadiers leaving only two alive.  They failed their motivation test and the last two were removed.


My turn 2 I was able to get the Tank-hunters from reserves.  The Marder and Panthers shot into the two Parachute Rifle Platoons and manage to inflict several casualties and even pinning them.


Here is where I think I made my first major mistake.  I had forgotten that no one could win the game until turn 6.  I did not move my Panthers because I did not want the 101st to control the objective.  I also had fault faith in my defensive fire.

So far my mortars have not done anything.  This was because all the action have been on the East and because of the night fighting rules they could not see far enough to shoot.  This change at turn 3.  The 101st received it first reserves and they landed on the West.


However the game was essentially decide when the red Parachute Rifle Platoon assaulted the Panthers.  They passed their tank terror test and the Panthers failed to get 5 hits on defensive fire to force them to retreat.  The assaulted was brutal and ended with ...


The game continue on until turn 6 but the Germans had little control in the East.  The 101st was able to neutralize any threats in the East relatively quickly and reserve showed up to help with the West.

The 101st wins 5 to 2.